
Drowning in Paper?
 Drowning in Paper? a reader asks…
Hi Chris, here it is the 21st century and with so much automated, I find I’m still buried in paper! Receipts, bills, notes, advisories, it just keeps filling my mailbox. I shovel all the junk mail right into the recycle bin, don’t even open it or read anything (all those wasted advertising dollars!) but the paper still piles up. Do you have any fairly easy way to deal with all this?
Absolutely. First let me say that organizing paper is such a droll task that most of us leave it off as long as possible – you have to almost literally be drowning before you do anything! So what follows is the method that I’ve adopted, gleaned from a bunch of different sources. It may not be right for everyone, but works for me, so I’m gonna tell you about it.
![]() Let me introduce you to Evernote (you could also go with Microsoft OneNote or any other note-organizing software, but I like Evernote best). Evernote is just a basic note-gathering app and service that lets you organize all your thoughts and ideas. It just happens to be perfect for digitizing and organizing your papers (and getting rid of the paper!). Highly flexible and it keeps getting improved, so I think it’s worth using. I’m going to suggest you make a few investments to help you get started.
Let me introduce you to Evernote (you could also go with Microsoft OneNote or any other note-organizing software, but I like Evernote best). Evernote is just a basic note-gathering app and service that lets you organize all your thoughts and ideas. It just happens to be perfect for digitizing and organizing your papers (and getting rid of the paper!). Highly flexible and it keeps getting improved, so I think it’s worth using. I’m going to suggest you make a few investments to help you get started.
First thing is you need to buy some stuff:
 Evernote (the service): just go to https://evernote.com/ and purchase either the Plus ($25/year) or Premium ($50/year) plans. Personally, I’d go for the premium version, you get all the features you’re gonna want as you start to go through the process of organizing all this paper. You’ll want to install Evernote on your computer (or computers if you use more than one), as well as your smartphone.
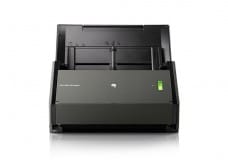
- The Evernote Scanner: ScanSnap by Fujitsu ($495). This can connect to your computer (with a USB cable), or be connected to your computer wirelessly (so you can place it anywhere that’s convenient). This is going to be your workhorse, so don’t skimp by using a cheap, multi-purpose scanner.
- The free Scannable app for your iPhone, or a scanning app for your Android or Blackberry (or Windows Phone) that can scan from the built-in camera, convert to PDF and add to Evernote.
- A good quality, heavy-duty paper shredder (such as this one from Amazon for $125): you want one that can handle at least a dozen sheets of paper at a time, staples, credit cards and CDs. While you’re at it, get yourself some shredder cleaner/lubricant sheets (like these) to keep your shredder from jamming up on you. Tip: don’t put anything through the shredder with a sticky back, such as those annoying mailing labels charities send you. The adhesive on them really gums up the shredder blades!
- Three or four boxes: These can be cardboard or something fancier, and anything from a shoebox up to a packing crate will do, depending on exactly how much paper you have.
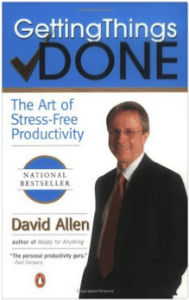 Ok, you might consider buying one more thing, a book. Getting Things Done by David Allen. It’s available in hard-cover, paperback, CD or Audible book from Amazon.com. You can get a Kindle/e-book version too. This can be a valuable tool to help you get your life organized. For now, just read the first three chapters for inspiration. If you commute to and from work, the CD or Audible version is great to listen to while you’re driving. Later on as you get involved in reducing that mountain of paper you can read the rest of the book. Before we move on, I should mention that there’s a website for GTD.com (that’s Getting Things Done), as well as a cool site called RestartGTD.com – that has a great 27-step process that you could try. Or read on for the method that I’ve developed by taking different bits of the great advice from lots of sources including RestartGTD.com.
Now, you want to set everything up. Don’t delay this part, or skip ahead to other parts before you do these things:
- Setup the ScanSnap scanner on your computer. Following the instructions at https://evernote.com/scansnap/ and just for fun, try scanning a few things. The scanner will come with a clear, ‘carrier sheet‘ which I highly recommend you use to scan those flimsy receipts from grocery stores, gas stations, etc. Evernote’s instructions say you can just send them through the scanner, but I’ve found these types of paper jam up all too frequently. Once you’ve got everything setup and have tested it out to see how it works, set this aside for a bit.
- Install the Evernote Web Clipper (and/or Clearly) extension on the web browser you use (Internet Explorer, Firefox, Chrome, Opera, Safari). Take just a minute to learn how to use it to clip web pages and send them to Evernote.
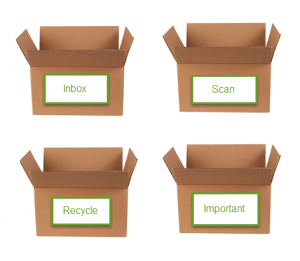
- Set your boxes up somewhere near where all your paper resides, probably on the floor somewhere. Label each box: Inbox, Scan, Recycle, and Important. Hint: You might want to have a fairly big Inbox to start, once you get going you can trade it for a smaller box. If you already have your mountain of paper swept up into one spot, that spot can be your inbox.
 Install the Evernote
 Now that your physical setup is ready, let’s get Evernote ready to use:
- You might want to watch some tutorials on how to use Evernote, such as this one (41 min) or this one (12 min) if you’re short on time. In particular, learn how to create and attach tags to notes, and learn how to create notebooks and organize them into stacks (hint, it’s all just a right-click away).
- You’re going to add some notebooks to Evernote, and then organize them into Stacks. This can be any kind of organization you want, and don’t worry, you can always re-organize and change things around later on. I have these stacks: Home, Work, Projects, Family and Memories.
- Add notebooks inside each of these stacks as you see fit. For myself, inside the Home stack I have these notebooks: Receipts, Bills & Statements, Documents, Photos & Graphics, Legal, Taxes, Home Projects, and one for each person in the house.
 Don’t spend too much time on steps 2 & 3 above, as it’ll probably change as you go along, and you’re going to want to focus more on tags than on notebooks. Tags will help you retrieve what you need quickly and easily, because you just search on a word (or phrase) you use as a tag to find whatever you’re looking for almost instantly.
Ok, you’re ready to tackle that mountain of paper! I’m guessing you’ve already got at least some organizing done, perhaps all your receipts are together, all your important papers, etc. If so, you can adjust the following steps as you see fit. But basically:
- Throw all that paper into the Inbox. That includes printed photos, receipts, tax documents, everything! If all your paper is already in one spot, you don’t have to move it, just proceed to the next step.
- Take each piece of paper out and decide to put it into the Scan or Recycle box. Repeat for every piece of paper. You don’t have to do this all at once! But you want to spend at least some time every week working on this.
- Everything that goes in the Recycle box either gets shredded (if there’s any personal information on it, such as your name and address), or tossed in the trash (or recycle bin if you have one). So don’t put anything in there that you think you might have some future use for.
The above doesn’t need to be done in one fell swoop – and really shouldn’t be! If you think of it that way, you’ll never get started. So just take a handful at a time, or whatever small bit works for you – even if it’s just one piece of paper. Continue to repeat the above 3 steps until all your paper is either in the Scan box or the Recycle box. As new paper comes into the house you can dump it into the Inbox box to deal with later, or go right to dropping it into the Scan or Recycle box. I like to open my mail daily, toss all the junk mail, open all the other envelopes and place any bills or papers where I have to do something with them into the Inbox box, and everything else goes into either the Scan or Recycle box. When I’m ready, I’ll take the bill out of the inbox, pay it (online or by writing a check), and then toss it into the Scan box.
Now this next part isn’t something you’re going to sit down and do all in one chunk either. You can do just a little bit each day, dedicate a few hours a week, or just work on it whenever you feel like it.
- Open Evernote on your computer
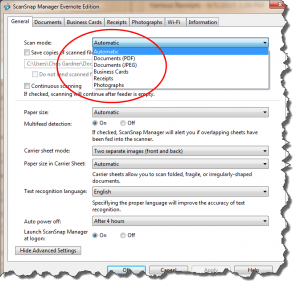
- Take a paper out of the Scan box and scan it into Evernote. If I have a lot of little receipts (like gas and restaurant), I’ll place them in the carrier sheet and scan the batch in one fell swoop. Hint: if you have a whole lot of the same type of papers already organized together, you can set the ScanSnap Manager so that instead of automatically classifying (aka ‘guessing’) the type you tell it in advance that everything you’re going to scan is a Document, business card, receipt or photo.
- Write a title: be as descriptive as you like. I like to just highlight the first part of the default title (such as “Scanned Receipt” and replace that with something, such as Electric bill. You can adjust the second part of the default title (e.g., the date and time which is the moment you scanned the paper) to the date on the bill or just leave it alone.
- Important step! Add some tags: these are words or phrases which relate to the paper. Just start adding words such as the name of the company, the bill amount, the type of bill, or whatever. Don’t skimp here, adding these tags will really help you when you’ve finished.
 Open Evernote on your computer
Ok, now you’re ready to finish processing that piece of paper – decide if it’s an important piece of paper you want to keep (and put it in the Important box). If not, put it in the Recycle box. For example, I deem important stuff like insurance documents (not bills, but the policy documents), warranties, legal documents, printed photos, and receipts for medium and big ticket purchases that I might want to return (and might need the original receipt for).
 So your Important box will fill up slowly, your Recycle box should fill up quickly and need to be emptied fairly often. I prefer the ‘mulch‘ method for the Scan box: as new items come into the house, they go on top in the Scan box, and I take care of all the new items first, then start to dig down into the older stuff. At some point, you might get to the bottom of the Scan box – but don’t worry if that doesn’t happen (ever!) – as long as you’re making headway you’re doing well enough. If I ever need to look for a piece of paper, I dig through the Scan box till I find it, and when I’m done I place it on top of the stack in the Scan box so it gets digitized sooner.
You can also add websites or webpages into Evernote with the Clearly extension for your web browser. And if you have any paper item that you want to scan but isn’t easily useable with the ScanSnap scanner, use the smartphone app – that’s good for things like pages of a book or other bound paper, 3-D objects, etc. I use Scannable with my iPhone and it’s really easy to use. I do take the time to put in a title for the note and add tags, which can easily be done on the Evernote app on your smartphone or on the computer. And you can add any important emails that you want to save by using the Clearly extension on your web browser (if you use a webmail service like Gmail), or the Evernote plugin for Outlook or OSX Mail. You can look at other Evernote extensions and apps and add whatever fits your lifestyle.
So that’s the method that I use to organize all that paper. I’m not saying it’s all done, I consider this a work-in-progress and only devote a small amount of time weekly to getting ahead of the paper. My measure of success is that the mountain doesn’t grow any larger, and big success is when it shrinks a bit!
This website runs on a patronage model. If you find my answers of value, please consider supporting me by sending any dollar amount via
") using any credit card (no Paypal account required), using Zelle, Apple Pay or Google Pay, or by mailing a check or cash to PosiTek.net LLC 1934 Old Gallows Road, Suite 350, Tysons Corner VA 22182.
I am not a non-profit, but your support helps me to continue delivering advice and consumer technology support to the public.
Thank you!
using any credit card (no Paypal account required), using Zelle, Apple Pay or Google Pay, or by mailing a check or cash to PosiTek.net LLC 1934 Old Gallows Road, Suite 350, Tysons Corner VA 22182.
I am not a non-profit, but your support helps me to continue delivering advice and consumer technology support to the public.
Thank you!There are currently 1277 reader comments on published articles, care to join in? Use the Leave a Comment form below/at the bottom of any existing comments. This is a good place to ask follow-on questions on this subject.


